Monday, November 19, 2018

TGV Codes

How do you eliminate TGV codes? Turn them off with Cobb Accesstuner.

I'm going to do a full TGV delete soon, but for now, I keep getting the error that the right hand is stuck open. Good. Fine! I don't want them to close, EVER. So, Accesstuner allows you to turn off the sensors. Done. Goodbye Check Engine light!


Tuesday, November 13, 2018

Ok, here is the list as it stands so far:

The previous owner installed the following:


  • Full Invidia exhaust, front to back, catless, headers and all. (I'm glad I didn't have to spend the money on this!)
  • Cobb Accessport 3
  • AEM short ram 
  • Mishimoto radiator
  • Mishimoto hoses
  • Exedy clutch and flywheel
  • ARP head studs
  • I assume Kartboy shifter bushings at the bottom of the shift lever
My changes:

  • Cobb short throw shifter
  • Prothane shifter bushings
  • Cobb 3 port EBCS
  • Car Chemistry 3 disc exhaust insert and packing (THIS CAR IS LOUD!)
  • Changed out the radio/speakers added a sub
  • HID headlights
  • Summit Racing Equipment LED fog lights
  • Painted factory wheels
  • Backup camera
Maintenance:

  • Rebuilt all shifter internals including replacing the shifter pivot. 
  • Changed all fluids 
Pending:

  • Whiteline steering rack bushings
  • Whiteline transmission mount insert
  • Cobb pitch stop

So, as you can see, the previous owner really left me in great shape to start this project. 

Monday, November 12, 2018

New Project

I haven't posted in quite some time. Lets bring things up to date.

I sold the T-Bucket. I just wasn't driving it much. We have two small boys, and, well, you can't put car seats in a car like that.

The new project is an 04 Subaru WRX wagon. Yeah, it's a bit of a change. But is it really?

My background is in sport compacts. It's what I truly prefer, if we are being honest. I've had all types of vehicles, but sport compacts always bring me back because of the more pure driving experience. They just handle better. And with modern turbocharged platforms, you can make a lot of power with little displacement, and even less weight.

So, back to my type of hotrod. Also, I do plan on eventually building something else, but it will have Subaru power. That will be down the road, but I plan on building a Factory Five 818C.

So here's a taste. More later along with the current mod list.


Thursday, June 6, 2013

A Bit of a Drop

I put new tires on last night and re-adjusted the suspension a bit. The original tires were a freebie set from my good friend Ricky (who corrected all my body work mistakes and sprayed the car). I knew that I would completely waste them as I tried to dial in the suspension settings. Also, as the springs settled, things changed. I'm working with 4.5 degrees caster and about 1/8" toe-in.  The old front tires were 225/50/16. The new ones are 205/40/16. I'm running about 25psi and will adjust from there.

Now, on to the comparison pic:


Monday, June 3, 2013

Interior Ideas....

There may be some changes coming for the interior. I'm sourcing another bench seat to modify. The current set-up is a modified bench/bucket from the back of a Fox body Mustang. It isn't holding up too well. It's getting a bit uncomfortable in the posterior.

A co-worker happens to have a bench out of a blazer. I plan on cutting the frame and foam down, or making my own foam. If possible, the rear trunk area will be modified for access from behind the seats.

Monday, January 7, 2013

Not Much Going On.... Yet

I haven't had much to report. My wife and I have been a little too pre-occupied (HAPPILY SO) with the arrival of our first child in October.

To be honest, I'm just having too much fun with my future little gearhead (or whatever he may be into) to even think about turning a wrench.

Plans for the tail end of this winter include an interior re-vamp, and perhaps a new transmission or a rebuild of the current one. It seems my TH350 is refusing to stop leaking from wherever it is leaking from. We shall see. As far as the interior, I'm planning a new, more secure, and with a slightly larger entry size for the rear storage. I want to be able to fit a small bag, some chairs, and perhaps a small soft sided cooler back there for some longer trips to shows. There is also a chance I may add a roll bar. That one is still up in the air.

Other than that, I can't wait for spring and some much needed "throttle therapy."

Monday, October 22, 2012

Monday, March 12, 2012

A matter of time...

Well, it was only a matter of time before I damaged something. After pulling the entire engine and trans to replace the front pump seal on my TH350, I was putting the carb back on when the threads stripped out on the intake manifold. DOH! So, the next day at work, I picked up a HeliCoill brand thread repair kit.

The kit consists of a tap, the insert, and the tool to install the insert.
Step one is to use the correct size drill (not included) to prepare the hole. Be careful here. You need to make sure the drill goes in completely straight. Also, be sure to cover any place that the metal shavings could get into. I used the handyman's favorite tool, duct tape, to cover the opening in the intake manifold.
Step two is to tap the hole with the provided tap. Be sure to go slow. I used a tap handle (also, not included) with the tap.


Next, use the install tool and thread the insert onto it. You can only thread it on one way as the bottom has a tang on it. More on that later...
 After using a blow gun to clear out the chips from the hole, thread the insert into the hole. It should be slightly lower than the top of the hole to ensure your new carb stud will thread properly. After the insert is at the proper depth, use a small punch to brake the tang off of the insert.

 The aforementioned tang..


This time around, I sprung for some ARP studs.


All done!

Wednesday, October 5, 2011

Been enjoying the ride!


Haven't been posting much, because I've been too busy having fun with the bucket!


Wednesday, June 8, 2011

YAY!

Drove it to work today! What a great day for a drive! I still have to work on the alignment a bit. It darts a little bit over really rough pavement, and tends to follow the crown in the road a bit. But, we'll get it done.

If the weather cooperates, the car will be at it's first show this weekend at Summit Racing Equipment for the annual Super Summit.

Can't wait!

Saturday, May 28, 2011

It passed!

100% road legal! More on that story later.

Monday, May 23, 2011

Inspection

The inspection is on Friday. Hopefully I've got all the i's dotted and the t's crossed. We'll see. Friday morning we load it up on the trailer and tow it with Ricky's big red truck and take it to Garfield Heights.

Wish me luck! The suspense of the next few days are going to kill me!

Sunday, April 17, 2011

Almost there!!!

The only things left before inspection are new windshield glass and to install the side and rearview mirrors!!!


Friday, April 15, 2011

Carpet and Shift Boot

More interior work with the help of my lovely wife.


Wednesday, April 13, 2011

Interior

Started work on the interior with the help of my AWESOME wife. This is just roughed in, but you get the idea. The Mexican blankets were made in Mexico... by Mexicans. :P


Saturday, April 9, 2011

Thursday, April 7, 2011

Quick Update


Getting closer to inspection time...


Sunday, February 20, 2011

Wiring

No real worthwhile pics for this one. I've got most of the wiring sorted out again. I still have to hook up the gauges, horn, and tidy up the electric fan wiring.

I'm also going to pick up some sheet aluminum so I can make my temporary gauge panel. I'm just intersted in getting the car ready for inspection right now, so until i can figure out another solution for the dash, this will do just fine. This car will more than likely be an ongoing project for years to come, so why not leave a little something for much needed "garage therapy" later down the road.

Friday, January 21, 2011

More E-Brake

Got the ebrake installed and functioning. I'm one step closer to inspection and titling.

I gotta say, Lokar makes fine products. Everything worked as designed. No problems, no suprises.

Saturday, January 15, 2011

E-Brake

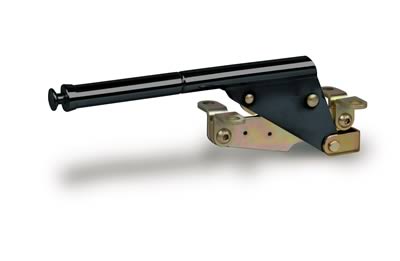
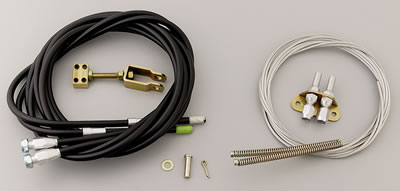
Picked up a Lokar e-brake handle and cable. Looks like a pretty straight forward install. Gonna hit it hard tomorrow after work.

Here's what I picked up: